Basics of iOS Networking – Swift Style

Networking in the mobile context largely entails communicating with external entities over the internet. Like most modern web or mobile platforms today iOS supports HTTP.

These network requests are referred to as ‘Tasks’ in the iOS world and there are three basic network tasks you can perform using the NSURLSession API

Data Tasks – These are network tasks where you exchange simple data which typically get stored in memory as a NSData object during server interactivity

Download Tasks – These tasks involve retrieving the contents of a url as a temporary file from a server (supports running as a background activity)

Upload Tasks – These tasks handle similar messages as the download tasks just in the opposite direction by uploading files to a server (also supports running as a background activity)

This API is asynchronous and provides what some might liken to callbacks in Javascript. The example below is a data task (indicated by ‘dataTaskWithRequest’)

Screen Shot 2016-02-11 at 5.26.25 PM.png

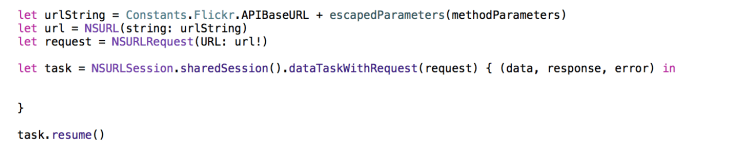
‘in’ signifies the beginning of the completion handler block. This call can’t actually be kicked off without calling resume method on the task

data refers to the actual data you expect back and looks like byte stream data when you get the service response. This needs to be deserialized which you can do like below

Screen Shot 2016-02-11 at 5.21.43 PM.png

response gives you details about your response such as status code and such

error gives you detail if there is an error. If there is none you can expect it to be nil. data is nil if an error is returned

This is not the all in all you need to know on iOS networking but at the very least it should give you a thousand foot view of what you need to know make very common network calls in iOS using Swift.

One last point to note. By default iOS limits regular HTTP calls favoring HTTPS calls out of box. So you need to account for extra steps to support network calls to urls that are prefixed with basic HTTP.


Delegates in Swift

Delegates in Swift are pretty cool. They work sorta like how inheritance works except that the actions a delegate can carry out are scoped rather than a default inheritance of all attributes or capabilities of the delegator.

One analogy is the President having a delegate to the UN. The delegate can carry out a set of actions on behalf of the President, but can’t really do everything the President can. A delegate is not an instance of what it represents.

The official Apple docs describes Delegation as “a design pattern that enables a class or structure to hand off (or delegate) some of its responsibilities to an instance of another type.”  One such a example is AVAudioRecorder , where a class that uses its instance to record audio can’t tell when it is done recording unless it’s a delegate.

AVAudioRecorder  uses a protocol to define what a delegate can know and do. As the source code shows below

public protocol AVAudioRecorderDelegate : NSObjectProtocol {

    optional public func audioRecorderDidFinishRecording(recorder: AVAudioRecorder, successfully flag: Bool)

    optional public func audioRecorderEncodeErrorDidOccur(recorder: AVAudioRecorder, error: NSError?) … 

}

By simply specifying my controllerView as a delegate I can now tell when recording is done

class RecordSoundsViewController: UIViewController, AVAudioRecorderDelegate {

    var audioRecorder:AVAudioRecorder! ….

    try! audioRecorder = AVAudioRecorder(URL: filePath!, settings: [:])

    audioRecorder.delegate = self

    func audioRecorderDidFinishRecording(recorder: AVAudioRecorder, successfully flag: Bool) {

        <#code#>

    }

}

Now your instance of one class type can carry out activities and responsibilities of another class. You go Delegate!

see more:

https://developer.apple.com/library/ios/documentation/Swift/Conceptual/Swift_Programming_Language/Protocols.html

How to Alter the Speed of an Audio File in Swift

Assuming you figured how to play an audio file in Swift, now you want to play with the speed of the audio. The rate property of the AVAudioPlayer object is what you need to change up the speed. The catch is that you need to set the enableRate property to true before you can actually do this.

Screen Shot 2016-02-02 at 5.25.11 PM.png

In this example I create a helper function to set things up. audioPlayer is my instance of AVAudioPlayerI set currentTime in my use case to start the audio from the beginning. It is also a good practice to stop the audio before playing.

Screen Shot 2016-02-02 at 5.18.17 PM.png

Then I call that function in my actions

Screen Shot 2016-02-02 at 5.18.29 PM.png

That’s it mainly.

A month with Swift and iOS Development

I never would have imagined I would touch iOS development. I have been an avid Android user since the birth of the Samsung Galaxy series. Actually, I was led down that path mainly because my experimental jailbroken 3gs iPhone was buggy. I had the last of it when the glass shattered on a vent and had trouble replacing the glass myself. I never thought I would be back to an iPhone. Besides, Android devices are just more open and allow for easier experimentation.

Enter 2015 when I thought I would give the iPhone another try after 5 years of hating. The iPhone 6 is a nice design. I was intrigued about the experience of a seamless experience across multiple form factors and I have somewhat liked what I have been my Mac, iPad and iPhone. I still think the notes app sucks (so glad google keep is now on iOS).

Having done quite a bit of Android dev and mobile dev using PhoneGap in its early days, the thought of using Objective-C was scary enough for me to never consider iOS development. That all changed with Swift. I have grown to love the expressiveness of languages like Ruby and Python. Any language that follows a similar form is sure to catch my attention. Swift has done just that.

It is not quite as flexible as Python, my go to prototype/hack language, but for a mobile development and on iOS Swift feels like a home run. I actually enjoy doing this now and finally gave the development tools that Apple provides a chance. I am one happy customer. The idea of writing this post really came from a Udacity course I’m currently going through titled Intro to iOS Development with Swift. I would highly recommend it for anyone looking to get their feet wet.

All in all, I like Swift and development for my iOS devices is now an exciting endeavor I never thought I would embark on.

My 2016 Challenge (1 min read)

17768794394_d4dcb320cc_k
Credit – Vodafone Medien

So, Mark Zuckerberg recently shared his 2016 challenge. Apparently, he takes on something new every year and it got me inspired.  Making focus a priority is a goal of mine moving forward in life and it seems well fitting to articulate what had been brooding in my mind to take on in 2016.

My challenge in 2016 is to make my home sentient. I spend a lot of a quality time in my home and it only makes sense for me to enrich the experience. I’m not sure what this end point really looks like – Jarvis from Iron Man? Maybe not but, I know my interest is to start with capturing key information around my home like power usage and internet bandwidth usage to be more aware of what’s happening in the home. Measure such things as temperature, humidity and presence detection. This is also so my home can intelligently respond to my living experience. Essentially, me learn about my home and my home learn more about me.

I already started some work around power usage monitoring and will be sharing what I have learned as well as my journey to make a smart home. Yes, that’s the word. I expect this will have varying elements of IOT, Big Data, Machine Learning and Deep Learning. All areas I have been looking forward to take a deep dive into.

I intend to write a monthly blog reflecting on my journey in between more technical blogs highlighting what I have actually done. You are welcome to tag along.


Wrapping My Mind Around Docker

**Finally decided to put this up after I writing it up a year ago. Sure hope someone finds it useful though slightly outdated**

It is amazing to see how quickly Docker has picked up pace in the tech industry with a lot of momentum in its sails for years to come. It is early and a great time to get on board. There are so many resources out there describing what Docker is, but so few articulate it as well as Nigel Poulton on Pluralsight (Docker deep dive tutorial). In fact I credit all descriptions here to him. I will not be one bit offended if you stop reading here to check out his tutorial and never come back here.

My aim here is to try to describe 4 key components that are core to Docker : The Docker Engine, Docker Images, Docker Containers and Docker Repos/Registry. This is part of my attempt to wrap my mind around this technology.

If you have perused the web on what docker is you probably may have come across the dockyard analogy. After a while it gets kinda boring to hear just one analogy, but it’s amazing to see how perfectly it describes it. The descriptions here do tag along this analogy, but also attempts to break each component down using simple words.

The Docker Engine

This is also referred to as the docker daemon. In the shipping analogy, think of the docker engine as the shipping yard. Essentially, it is a program that provides standardized app infrastructure and runtime dependencies needed to run containers.  So if you think about this in the context of the analogy. The shipping yard has standard cranes, paths and machines which hardly ever vary from dock to dock. So a worker who goes to another shipping yard even in a different country should easily be able to operate the machinery upon arrival because the infrastructure is standardized and optimized to ship containers. This is how docker provides portability.

The Docker Image

This is the manifest in the shipping analogy. Essentially, it is a static or frozen version of a container that contains data and metadata needed to fire up a container. Typically a manifest describes what is being shipped and probably comes with instructions on how to handle the shipment.

The Dock Container

Well this is where the goods go in. Simply put, it is the running instance of an image. It is a light weight instance of linux

Docker Repositories and Registries

The best way to think about this really is the Apple app store or Google play store. Think of each app as a repo and the app store as the registry. Better yet, you can also think of this in terms of Github as the registry and the repos, well as repos. The thing to keep in mind here is that some images are verified and not all images can be trusted. Images which don’t require user prefix (like Ubuntu, Nginx, Mongodb etc ) have usually been verified by the docker team. Said more formally repos are where images are pulled from and registry is where images live (docker hub being the default)

I know this was not deep and comprehensive. I can share more on what I have grasped so far, but I’m not expert by any means. I do hope you are one step closer to nailing down this technology. Now go check out Nigel’s tutorial.

Create a free website or blog at WordPress.com.

Up ↑